In industries where equipment downtime can shut down an entire production line, there’s one universal truth: downtime costs money. A lot of money. According to a 2023 survey by ABB (covering energy, oil & gas, manufacturing, and other heavy-industry segments), unplanned downtime often costs about US $125,000 per hour. With stakes this high, reliability teams can’t afford processes that slow them down.
Yet many organizations still manage FMEA (Failure Modes & Effects Analysis) the same way they did a decade ago—inside sprawling spreadsheets with tabs that multiply faster than failure modes themselves. If you’ve ever opened an “FMEA_final_USE_THIS_ONE.xlsx,” you know exactly the kind of operational risk we’re talking about.
Spreadsheets are useful, sure. But they’re not built for live maintenance data, cross-team collaboration, or fast decision-making. One wrong filter, one overwritten cell, one “Did someone change the RPN column?” and suddenly your risk analysis is just… wishful thinking.
That’s where a CMMS steps in. By moving FMEA from static files into a dynamic system, teams can automate preventive actions, track failures in real time, and keep everyone aligned without relying on a spreadsheet that freezes every time someone adds a new row.
In this guide, we’ll walk you through how to migrate your manual, spreadsheet-based FMEA into a modern CMMS; smoothly, confidently, and with far fewer Excel-induced headaches.
What is a CMMS (Computerized Maintenance Management System)?

A Computerized Maintenance Management System (CMMS) is a centralized platform designed to plan, manage, and document all maintenance activities within an organization. In asset-intensive industries such as oil and gas, energy, chemicals, manufacturing, and industrial services, a CMMS serves as the operational backbone that ensures equipment reliability, regulatory compliance, and continuity of operations.
A modern CMMS brings structure, traceability, and real-time visibility to maintenance processes that are otherwise fragmented or reliant on manual tools. Its core functions typically include:
1. Asset Information Management
A CMMS maintains detailed records of equipment, components, maintenance history, OEM specifications, failure events, and supporting documentation. This creates a single source of truth across the organization.
2. Preventive and Predictive Maintenance Scheduling
Maintenance schedules—inspection intervals, lubrication cycles, calibration routines, and safety checks—are automated based on predefined rules or sensor-driven triggers. This ensures consistency and reduces reliance on memory or manual calendar updates.
3. Work Order Management
Work requests, corrective tasks, and preventive work orders are initiated, assigned, executed, and closed electronically. This standardizes how work is captured, prioritized, and audited across teams and facilities.
4. Inventory and Spare Parts Control
The CMMS tracks spare parts, reorder points, stock levels, supplier information, and procurement activity. This minimizes risk of stockouts and optimizes inventory carrying costs.
5. Data Capture, Reporting, and Compliance
A CMMS logs every maintenance activity, providing traceability required for compliance with regulatory frameworks (such as OSHA, ISO 55000, EPA, and industry-specific quality standards). It also consolidates operational data to produce KPIs like MTTR, MTBF, wrench time, and PM compliance rates.
What is FMEA?
Failure Modes and Effects Analysis (FMEA) is a structured methodology used to identify potential ways an asset, component, or process can fail and to analyze the potential consequences of those failures. It is an established reliability engineering technique adopted across oil and gas, energy, manufacturing, utilities, chemicals, and other asset-intensive industries. The objective is to understand risk before it leads to equipment breakdowns, safety hazards, compliance issues, or production loss.
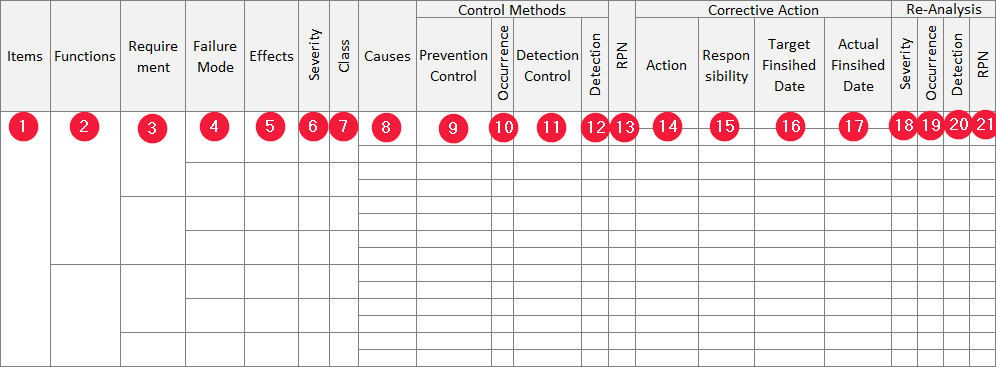
FMEA helps maintenance and reliability teams evaluate risk by examining the following elements:

Failure Mode
The specific manner in which an asset or component can fail. Examples include overheating, loss of pressure, misalignment, corrosion, leakage, electrical shorting, or bearing wear.
Cause
The underlying reason for the failure mode. Common causes may involve improper lubrication, material fatigue, contamination, calibration drift, incorrect installation, temperature extremes, or operator error.
Effect
The consequence of the failure. This may involve reduced performance, unexpected downtime, product quality deviations, safety exposure, environmental risk, or full equipment shutdown.
Severity, Occurrence, and Detection Ratings
To quantify the level of risk, each failure mode is assigned numerical values:
- Severity: The seriousness of the effect on operations, safety, or product quality
- Occurrence: The likelihood of the failure happening
- Detection: The probability of detecting the failure before impact
These values are multiplied to create the Risk Priority Number (RPN), which helps prioritize which failures require immediate action.
What are the Types of FMEA?
FMEA can be applied in several ways depending on the purpose of the analysis and the stage of the asset or process lifecycle. Although the core methodology remains consistent, the focus of each FMEA type differs. Understanding these distinctions helps teams choose the right approach for their reliability objectives. Here are the three main types:
1. Design FMEA (DFMEA)
Design FMEA evaluates failure risks at the design or engineering stage. It identifies how a product, component, or system could fail before it is manufactured or placed into service.
In asset-intensive industries, DFMEA helps engineering teams eliminate weaknesses early, reduce redesign costs, and improve long-term reliability.
When it is used:
- Designing new equipment
- Modifying an existing asset
- Evaluating equipment supplied by OEMs
2. Process FMEA (PFMEA)
Process FMEA focuses on how failures occur within an operational or manufacturing process. Rather than analyzing equipment alone, it evaluates steps in the workflow where defects, errors, or interruptions may occur.
When it is used:
- Production processes (for example textile finishing, filling, mixing, batching)
- Safety-critical operations (for example fuel transfer, chemical dosing)
- Repetitive tasks performed by operators or automated systems
3. System FMEA (SFMEA)
System FMEA takes a broader view and analyzes interactions between multiple subsystems within a larger system. This is valuable for complex operations where failures are often interdependent.
When it is used:
- Large industrial systems with electrical, mechanical, and control integrations
- Oil and gas processing systems
- Multi-stage manufacturing lines
- Power generation or distribution systems
What is the Purpose of FMEA?
At its core, FMEA allows organizations to proactively identify vulnerabilities within their equipment and processes. It creates a structured view of risk, ensures consistency in how failures are evaluated, and supports informed decision-making about preventive maintenance, redesign, spare parts planning, and resource allocation.
FMEA is not only a reliability tool. It is a common language for maintenance, engineering, operations, and safety teams, allowing everyone to assess and mitigate failure risks in a systematic way.
How to Perform FMEA?
Performing an FMEA involves a systematic evaluation of how an asset or process can fail, what the consequences of that failure are, and which actions are required to reduce risk. The process is structured and methodical to ensure consistency and to give organizations a repeatable framework for assessing equipment vulnerabilities.
Before beginning the analysis, it is important to determine which type of FMEA is appropriate. Depending on the objective, this may be a Design FMEA, Process FMEA, System FMEA, or Maintenance FMEA. Selecting the correct type ensures that the analysis remains aligned with organizational goals and the asset’s operational context.
Once the appropriate FMEA type is selected, the following steps outline a standard approach used across maintenance and reliability teams.
The following steps outline a standard approach used across maintenance and reliability teams.
Step 1. Define the Scope of the Analysis
Before any analysis begins, the team must clearly define what is being evaluated and why.
FMEA works best when the scope is focused rather than broad.
Examples of scope definitions:
- A specific asset (for example a boiler feed pump, gas compressor, dyeing machine, or cooling tower)
- A subsystem within an asset (for example lubrication circuit, electrical panel, filtration system)
- A production process (for example fuel transfer process, textile finishing process)
This step prevents “scope creep” and ensures the entire FMEA team is aligned on the boundaries of the analysis.
Tip: Instead of analyzing the entire refinery or manufacturing plant, start with the pump that has been causing repeated downtime. This creates a more actionable and realistic starting point.
Step 2. Break Down the Asset or Process into Functional Components
Once the scope is set, the next step is to understand how the asset is built and how it operates. Breaking the equipment into functional components provides a clearer view of where failures can originate. Consider a typical centrifugal pump. It can be divided into elements such as
- Motor
- Coupling
- Bearings
- Impeller
- Mechanical seal
- Pump casing
- Control panel
- Suction and discharge lines
This step is especially important for complex industrial assets where electrical, mechanical, and control systems interact. A structured breakdown ensures that the team systematically identifies failure modes at the right level of detail rather than based on assumptions or incomplete knowledge.
Tip: Think of this step as opening a machine’s “blueprint.” You want to see where things can go wrong before you start listing failures.
Step 3. Identify All Possible Failure Modes
The next stage is to identify all the ways each component can fail. This involves understanding the equipment’s function, how it performs under normal conditions, and the mechanisms by which that performance can degrade. Failure modes may include:
- overheating
- leakage
- loss of pressure
- increased vibration
- corrosion
- misalignment
- contamination
Apart from the above-mentioned failure modes, think of any other deviation that can prevent the asset from operating reliably. A practical way to think of this step is to ask,
“What could stop this equipment from performing its intended function?”
This mindset helps teams capture both obvious and less visible risks. This may include conditions such as cracking, short circuits, torque fatigue, deformation, or any functional irregularity that increases the likelihood of failure.
This step becomes far more accurate when supported by real operational data. A modern CMMS captures detailed records of previous breakdowns, corrective work orders, technician observations, and recurring issues. Reviewing this information helps teams identify failure modes they may not have considered during a purely theoretical exercise.
For example, if there are several logged work orders mentioning elevated vibration or repeated seal replacements, these become clear indicators of failure modes worth adding to the analysis.
Step 4. Determine the Effects of Each Failure Mode
Once the failure modes are listed, the next question is, “What happens if this failure occurs?”
Effects describe the consequences and can range from minor performance drops to severe safety or environmental risks. Here are a few examples:
- A leaking seal might cause product contamination.
- A bearing failure might lead to increased vibration that eventually causes motor damage.
- A pressure loss in a gas compressor might force an unplanned shutdown.
Describing effects clearly is critical. Generic statements such as “machine stops working” do not provide enough insight. Instead, effects should outline operational, financial, and safety implications. This clarity ensures that decision-makers understand the impact of each failure and can prioritize appropriately.
Step 5. Identify the Causes Behind Each Failure Mode
Every failure mode stems from specific causes. Understanding those causes enables the organization to determine what preventive actions are effective. This means looking at what could trigger the issue in the first place. Thinking this way helps the team avoid general answers and focus on what actually leads to failure in real operations.
Here are simple, relatable examples of common causes:
- Human error – For example, using the wrong lubricant, installing a part incorrectly, or skipping a step in a procedure.
- Material defects – Such as receiving a batch of low-quality seals or bearings that do not meet the expected standards.
- Incorrect engineering requirements – For example, choosing a motor that is too small for the load or selecting materials not suitable for the operating environment.
- Environmental conditions – Corrosion from moisture, overheating due to poor ventilation, or contamination from dust and debris.
- Inconsistent operating conditions – Such as fluctuating pressure, sudden load changes, or running equipment outside its recommended limits.
This step is closely connected to Root Cause Analysis (RCA), which helps teams look beyond the obvious. RCA encourages you to ask what upstream factor actually led to the failure, rather than stopping at the visible symptom.
Step 6. Assign Severity, Occurrence, and Detection Ratings
Once each failure mode, cause, and effect is understood, the next step is to evaluate its overall risk. FMEA uses three numerical ratings to do this. Each one is scored from 1 to 10, where higher numbers represent higher risk or lower detectability.
These three ratings help teams compare many different failures using a consistent framework.
How to Assign Severity Ranking
Severity is about understanding how badly the failure affects the system. Consider the impact on operations, equipment, safety, and production output. Think of Severity in terms of cost, downtime, damage, or safety risk.
Rank each failure on a scale from 0 to 10 where:
- 0: This failure has no measurable impact.
- 10: This failure is dangerous and requires immediate intervention.

How to Assign Occurrence Ranking
In this step, consider how often the failure is likely to happen.
Rank each failure from 0 to 10 where:
- 0: This failure is extremely unlikely to occur.
- 10: This failure is virtually guaranteed to occur.
Focus on the likelihood of the failure itself, not the downstream issues it may trigger. Use historical data, team experience, and operating conditions to guide scoring.

How to Calculate and Assign Failure Detection Ranking
Now consider how easy or difficult it is to detect the failure before it becomes a problem.
Rank each failure from 0 to 10 where:
- 0: You are almost guaranteed to detect this failure early.
- 10: There is no way to detect this failure before it occurs.
Think about existing controls, inspections, alarms, sensors, or monitoring methods. Strong detection systems should lower this score.

Step 7. Calculate the Risk Priority Number (RPN)
After assigning the Severity, Occurrence, and Detection scores, the next step is to combine them into one overall risk value. This number helps you quickly compare different failures and determine which ones deserve immediate attention.
The formula is:
Let’s say a failure mode has severity 5, occurrence 2 and detection 8
The RPN would be: 5 × 2 × 8 = 80
This tells you that while the failure isn’t extremely common, and may not be severe enough to shut down operations entirely, it is hard to detect, which pushes the risk score higher than you might expect.
Once you calculate the RPN for every failure mode, sort your list from highest risk to lowest. This helps your team see where to focus first:
High RPN = needs urgent attention
Medium RPN = should be monitored or improved
Low RPN = acceptable risk, or minimal impact
Each organization decides its own “critical” threshold based on industry, safety standards, and operational sensitivity. For some, anything above 100 is high risk. For others, the cutoff may be 50.
Step 8. Develop and Prioritize Mitigation Actions
Once the RPN is calculated and the high-risk items stand out, the next step is to decide how you’ll bring those numbers down. The goal here is simple: identify practical steps that reduce the likelihood of failure, make it easier to spot early, or lessen the impact if it does occur.
A good improvement plan usually focuses on a few straightforward questions:
1. Can we prevent this failure from happening as often?
This could involve changing a troublesome component, improving installation practices, tightening operating limits, or adjusting maintenance frequency.
If preventive actions become part of routine work, they can be scheduled inside your CMMS so they’re carried out consistently.
2. Can we catch the issue sooner the next time?
Sometimes failure isn’t the problem, not noticing it early is. Adding inspection steps, installing basic sensors, or refining checklists can make detection more reliable. These enhancements can also live inside your CMMS, ensuring they’re part of day-to-day operations rather than one-off fixes.
3. Can we limit how much damage it causes?
If a failure cannot be avoided completely, consider what can be done to minimize the impact. This might include isolating vulnerable components, improving protective measures, or planning for controlled shutdowns.
The actions you choose do not need to be complicated. In many organizations, small adjustments — when tracked properly and repeated consistently — are enough to move a failure mode from “high risk” to “manageable.”
Step 9: Recalculate the RPN
After the improvements are implemented, revisit the failure mode and reassess the Severity, Occurrence, and Detection scores. If the actions were effective, at least one of those values should decrease, bringing the overall RPN down.
This step is more than bookkeeping. It helps you validate whether the recommended actions worked and whether more adjustments are needed. Your CMMS becomes helpful here by providing updated maintenance history, inspection results, and failure patterns, giving you real-world evidence to support the new rating.
What to Consider Before Running an FMEA?
FMEA is most effective when it’s approached with clarity and commitment. It isn’t a formality or a quick exercise; it’s a structured way to understand risk at a deeper level and strengthen how your operation handles failure. When done thoughtfully, it gives teams a sharper view of where issues originate and what truly needs attention.
This overview is meant to help you approach the process with confidence and know what to expect. And as you work through it, using accurate maintenance history and real asset data from your CMMS always leads to better decisions. The quality of the insights depends on the quality of the information going in.
Final Thoughts
FMEA is a powerful tool for understanding failure, but the real value comes from carrying insights into daily operations. A CMMS makes this possible by turning decisions from the FMEA into scheduled tasks, inspections, reminders, and long-term maintenance routines.
It closes the gap between knowing what could go wrong and doing something about it.
Used together, FMEA gives you clarity and a CMMS gives you control. It’s a combination that leads to more reliable equipment, fewer surprises, and stronger operational performance over time.